Corner points alone limit where you can actually tie someone. A ridge line fixes that: a rope tensioned hard between the two legs on one side of the bed becomes a rail you can attach to anywhere along it. Slide an attachment wherever you want it, load it, and it locks. This guide follows the techniques taught in TheDuchy's knot archive — all credit to TheDuchy.
1. The ridge line concept
- Tension is everything. A slack ridge line gets dragged around and your anchor points move mid-scene. Pre-tension hard and re-check after the first session — jute stretches and settles.
- The legs are the weak point. The whole side's load goes through two leg attachments. They must be tied as solid anchors (section 3), not just looped.
- Two heights beat one. A second line low, near the floor, gives you high and low anchor points with no extra hardware.
- Rope: 6mm jute is what every technique below was written for — its high-friction lay is exactly what the Prusik knots bite into. Soft slippery synthetics need extra wraps.
- Length: a 30 ft (~9 m) length covers one side of a standard bed with generous leg wraps and tails to spare.
Not for suspension. A ridge line between bed legs is for limb restraint and spread-eagle ties. It is not a rated hard point and has no load-tested failure behavior. Never suspend, never partial-suspend from it.
2. Building the ridge line, step by step
This side-of-the-bed rail is a short basta hard-point anchor built the same way TheDuchy's Hashira Anchor turns a post into a hard point — wrapped, reverse-tensioned, and double-locked. Adapting it to a bed leg:
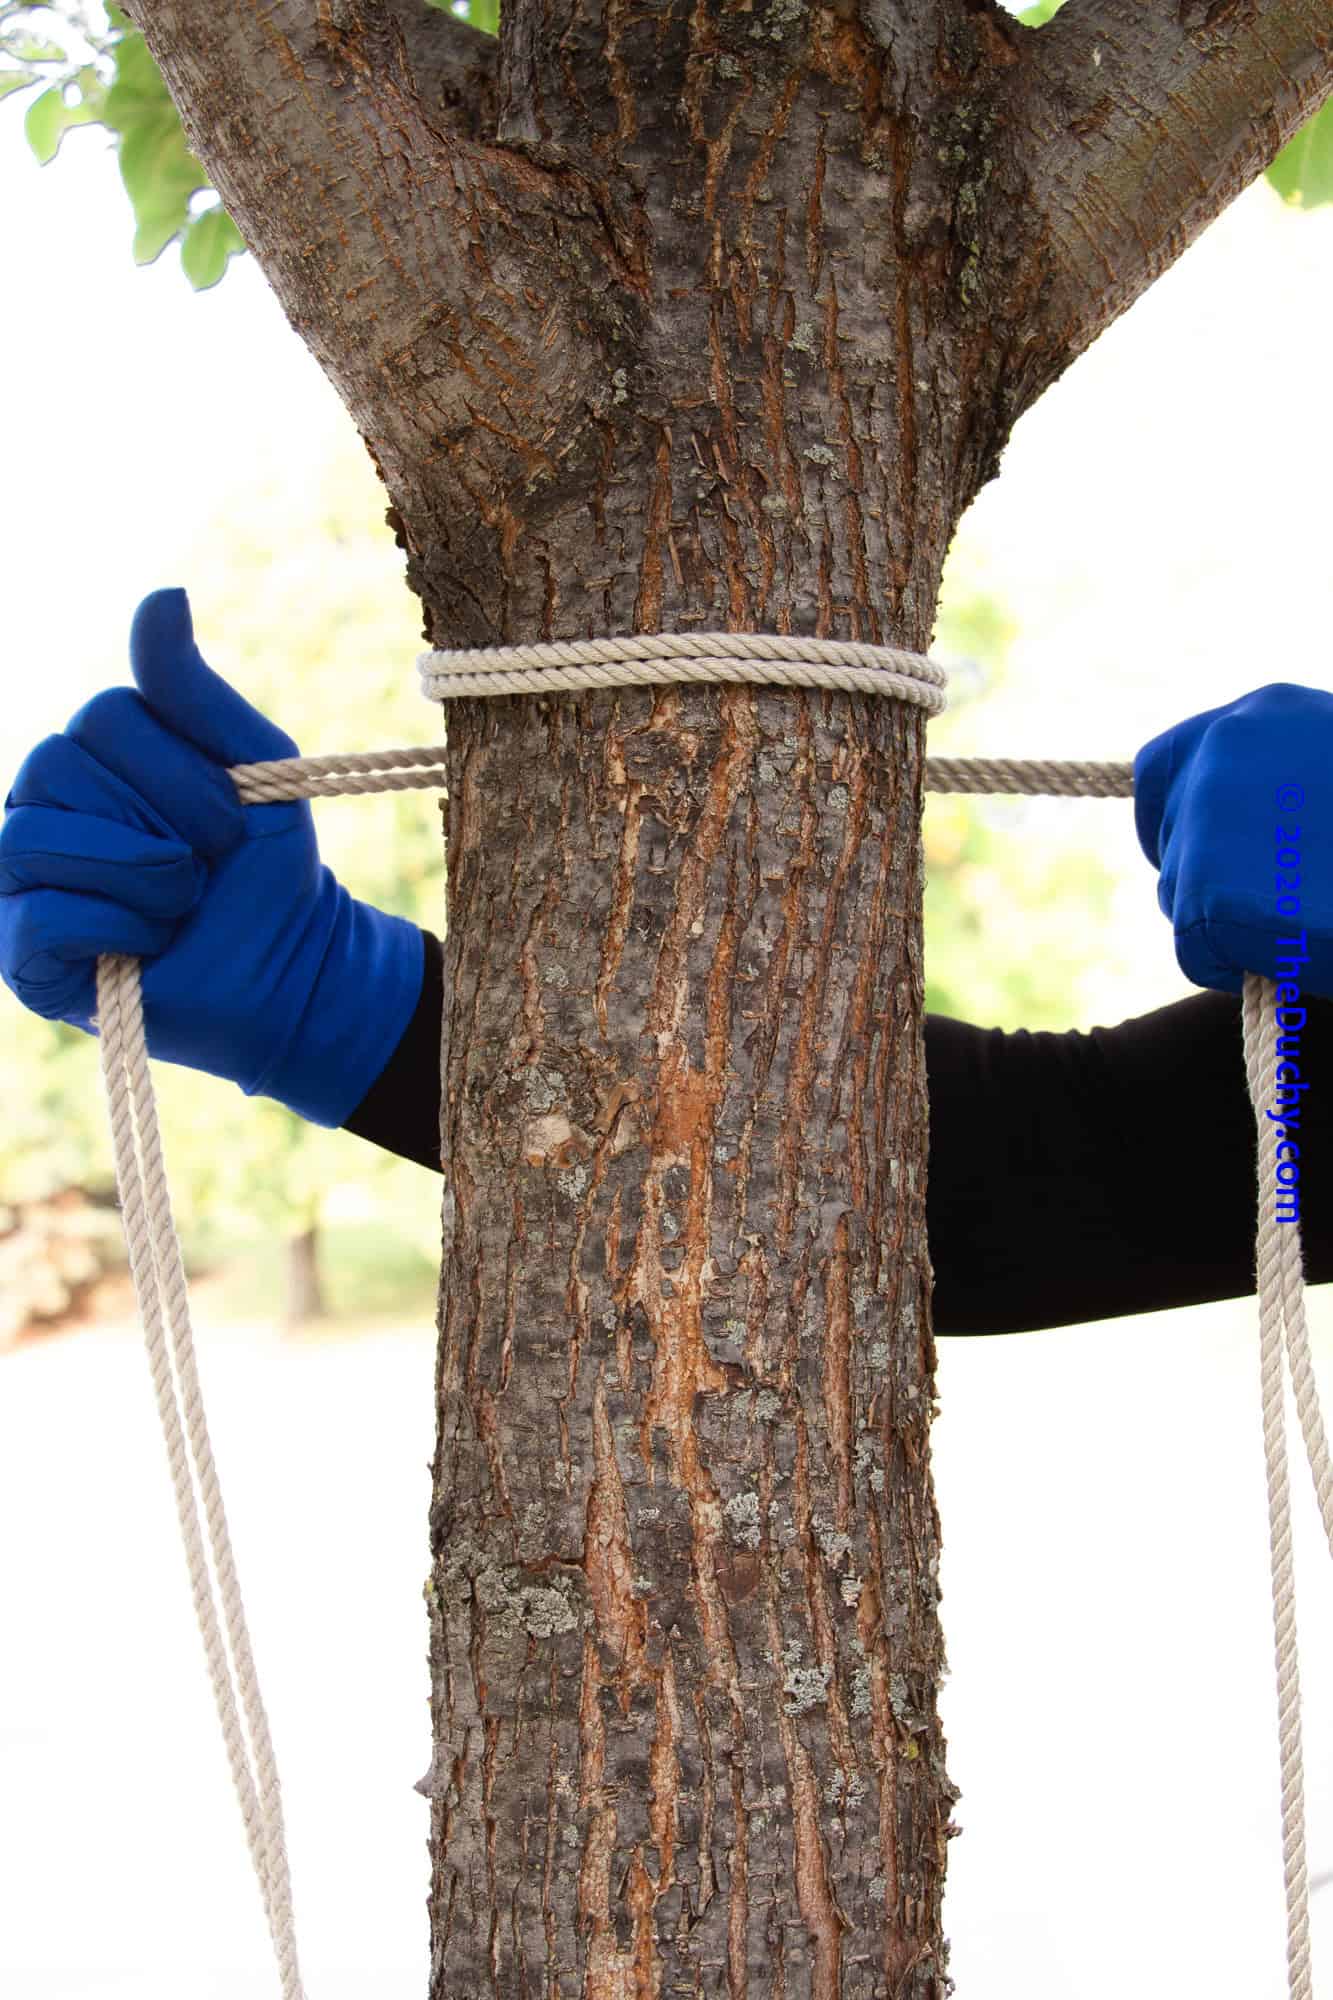
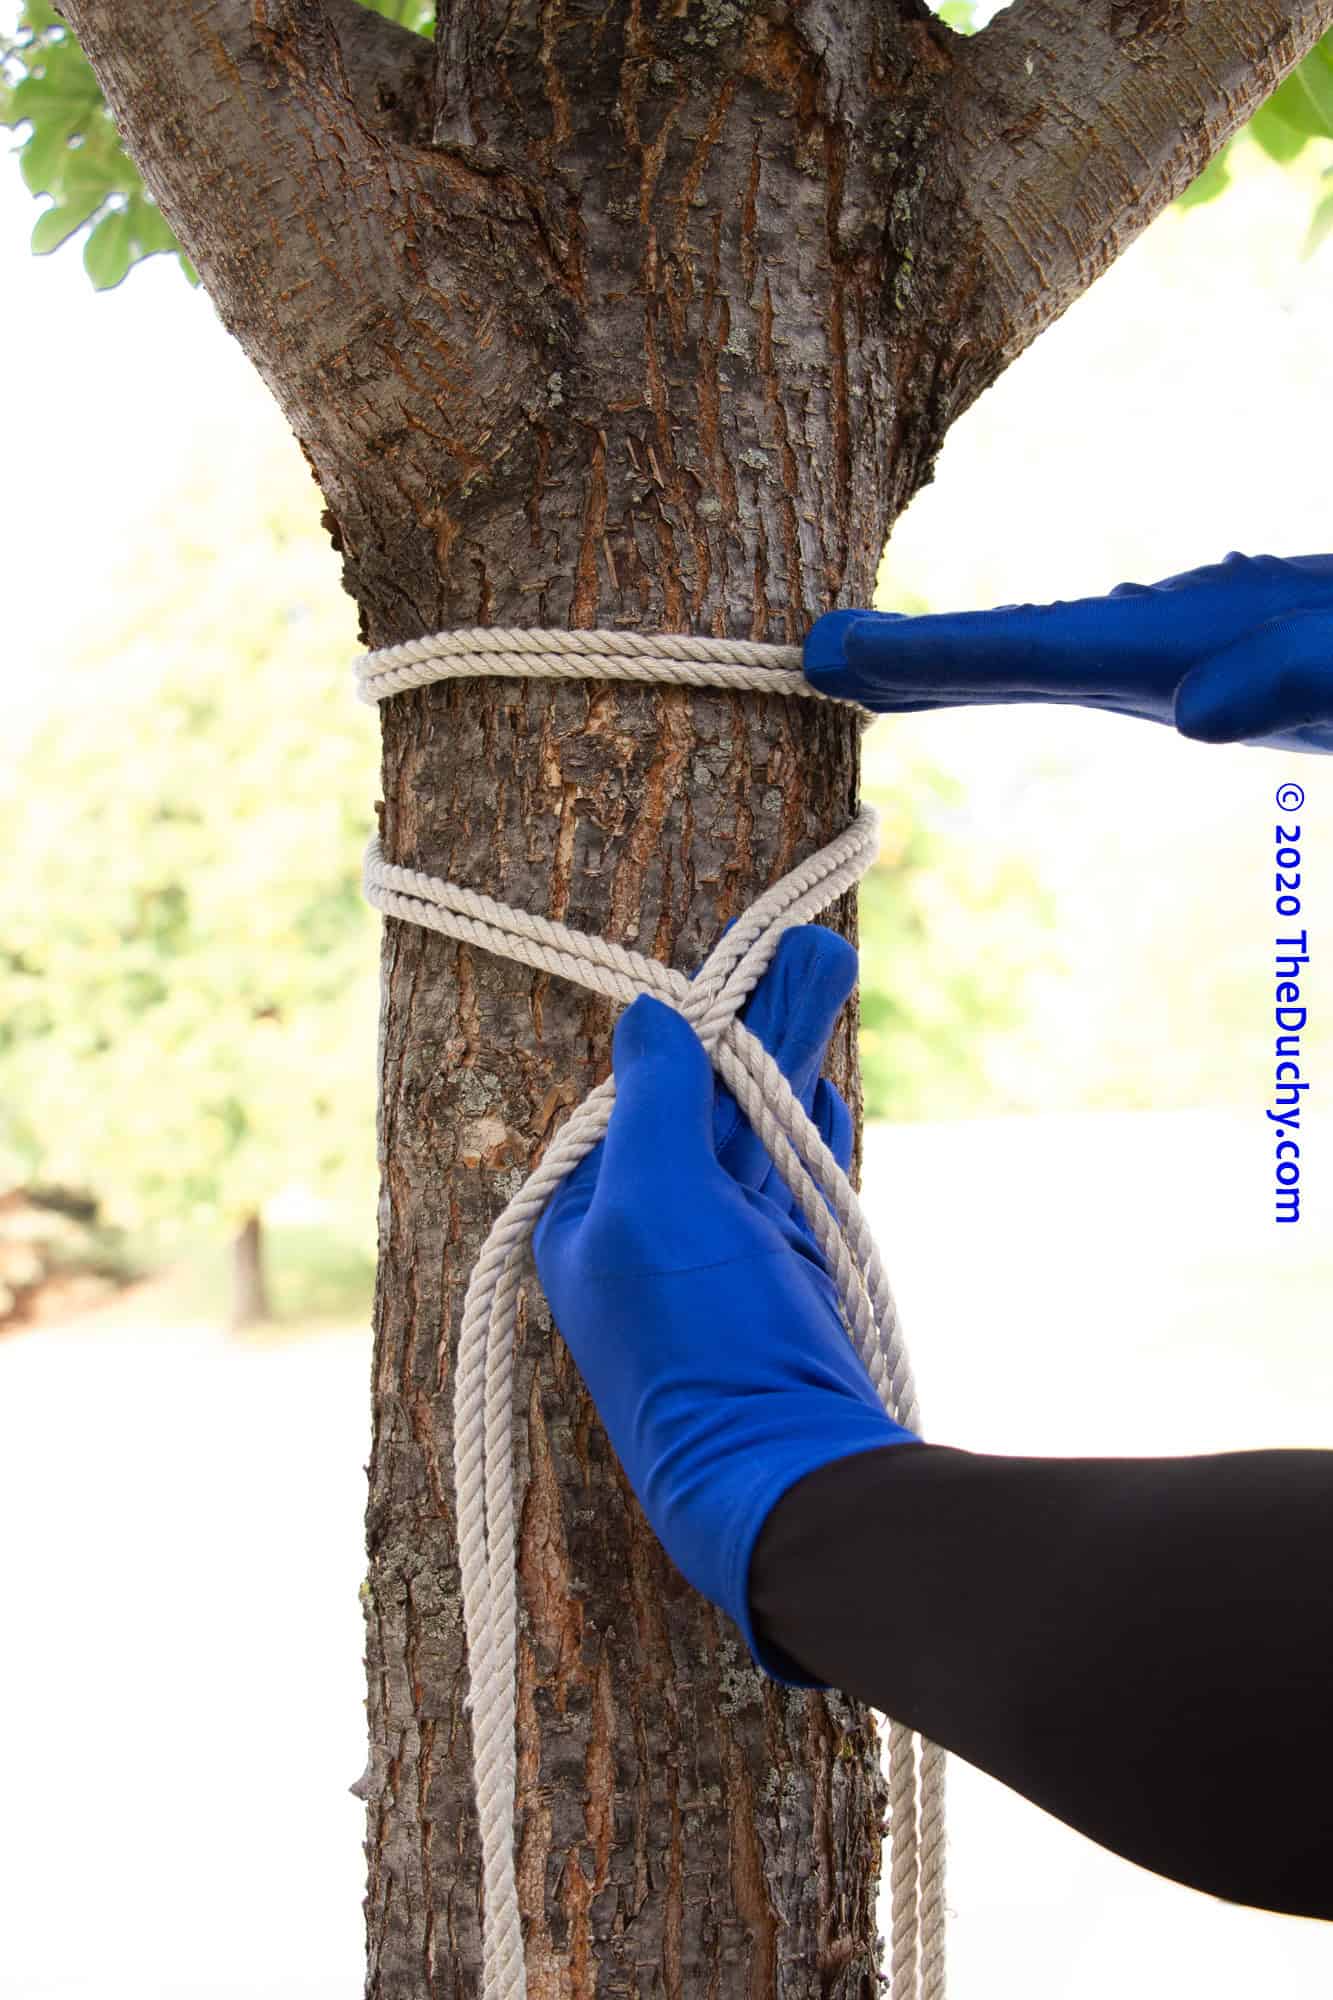
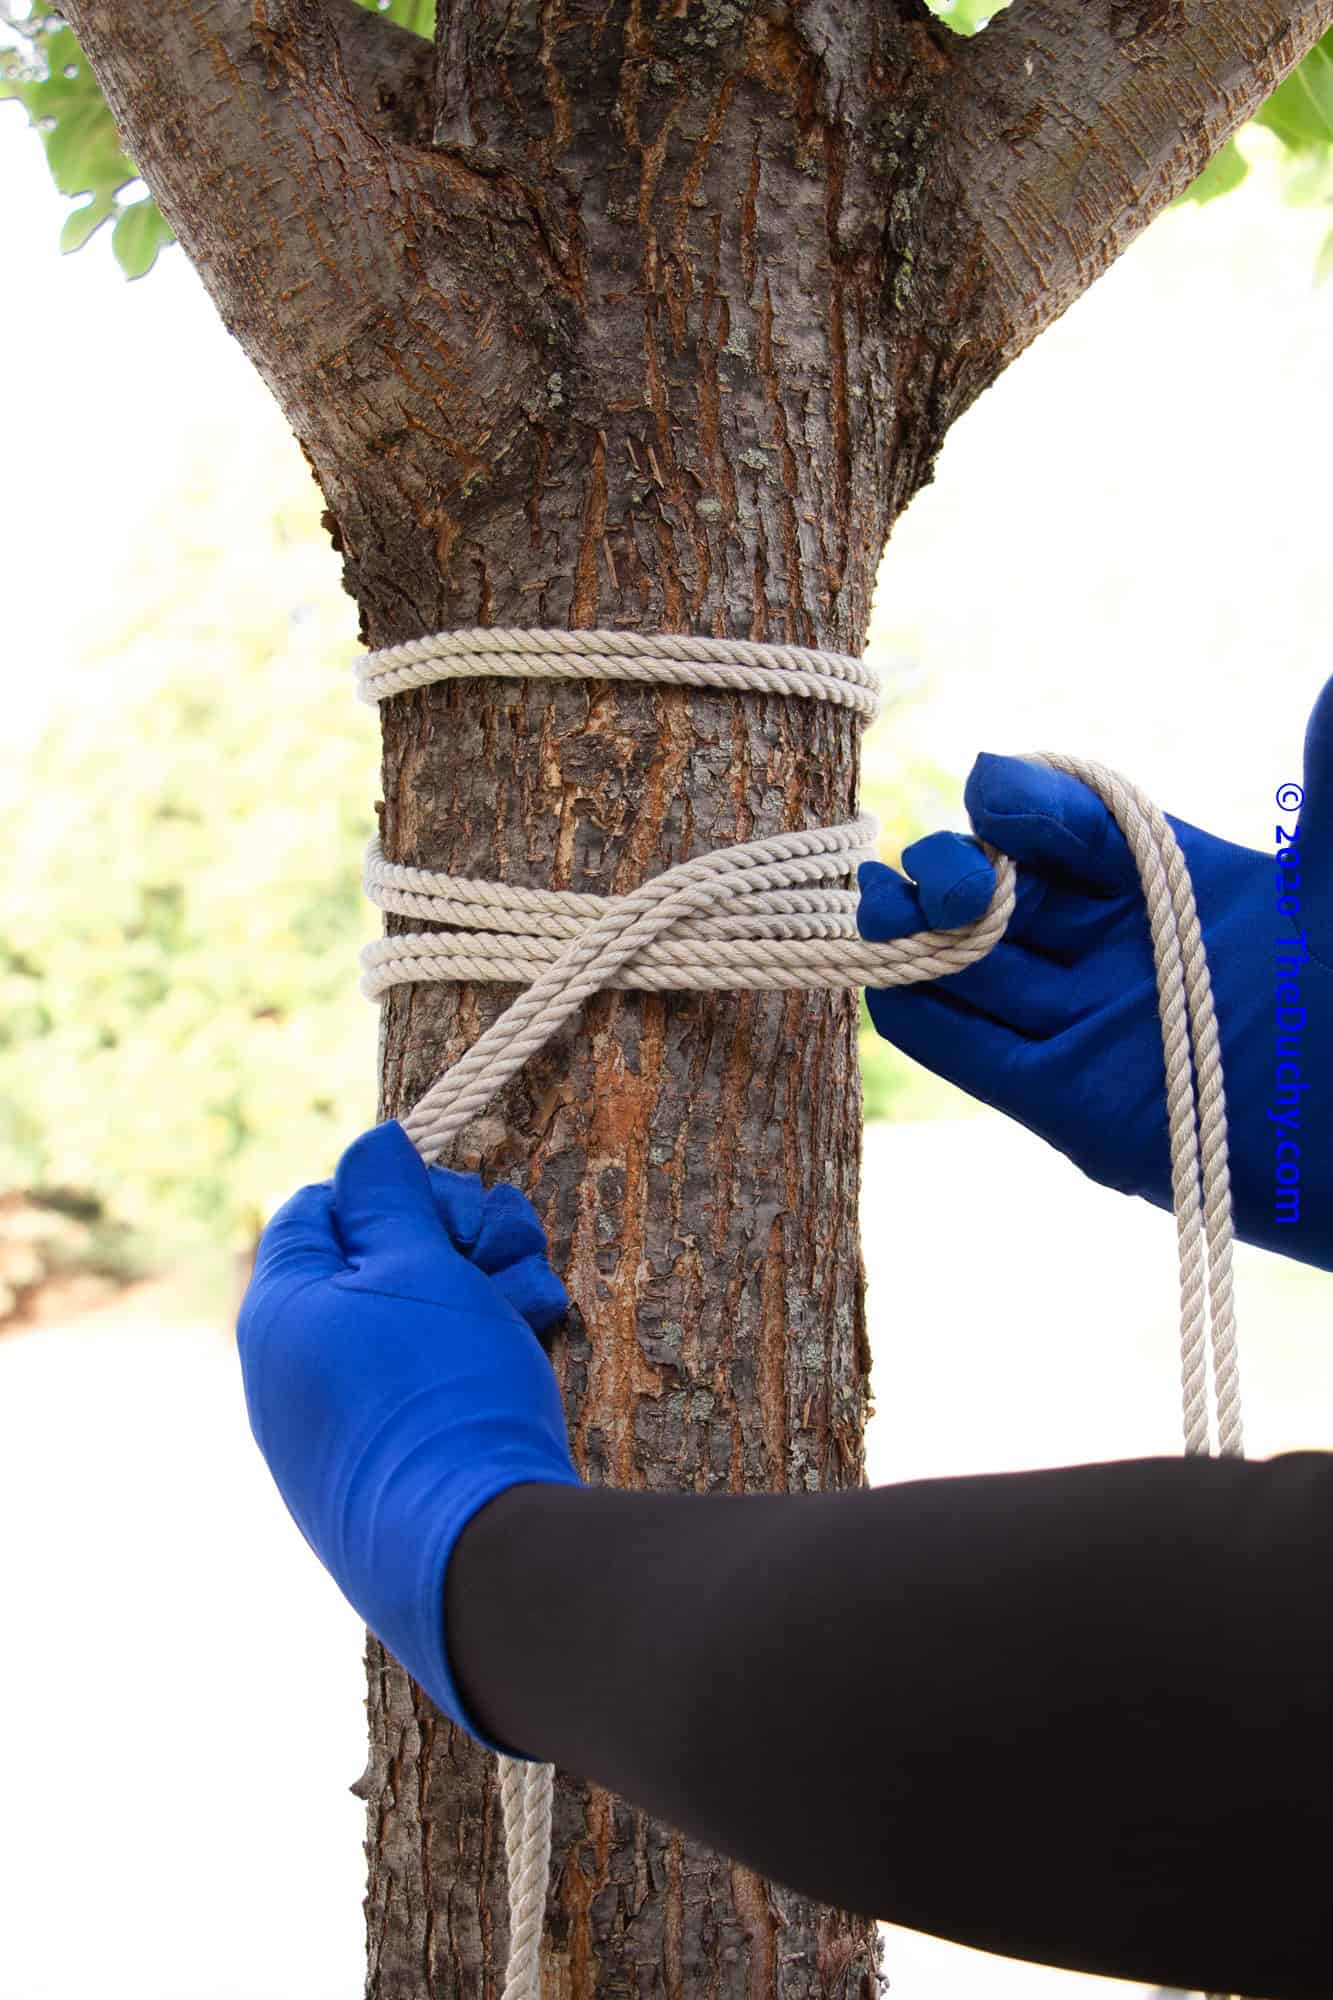
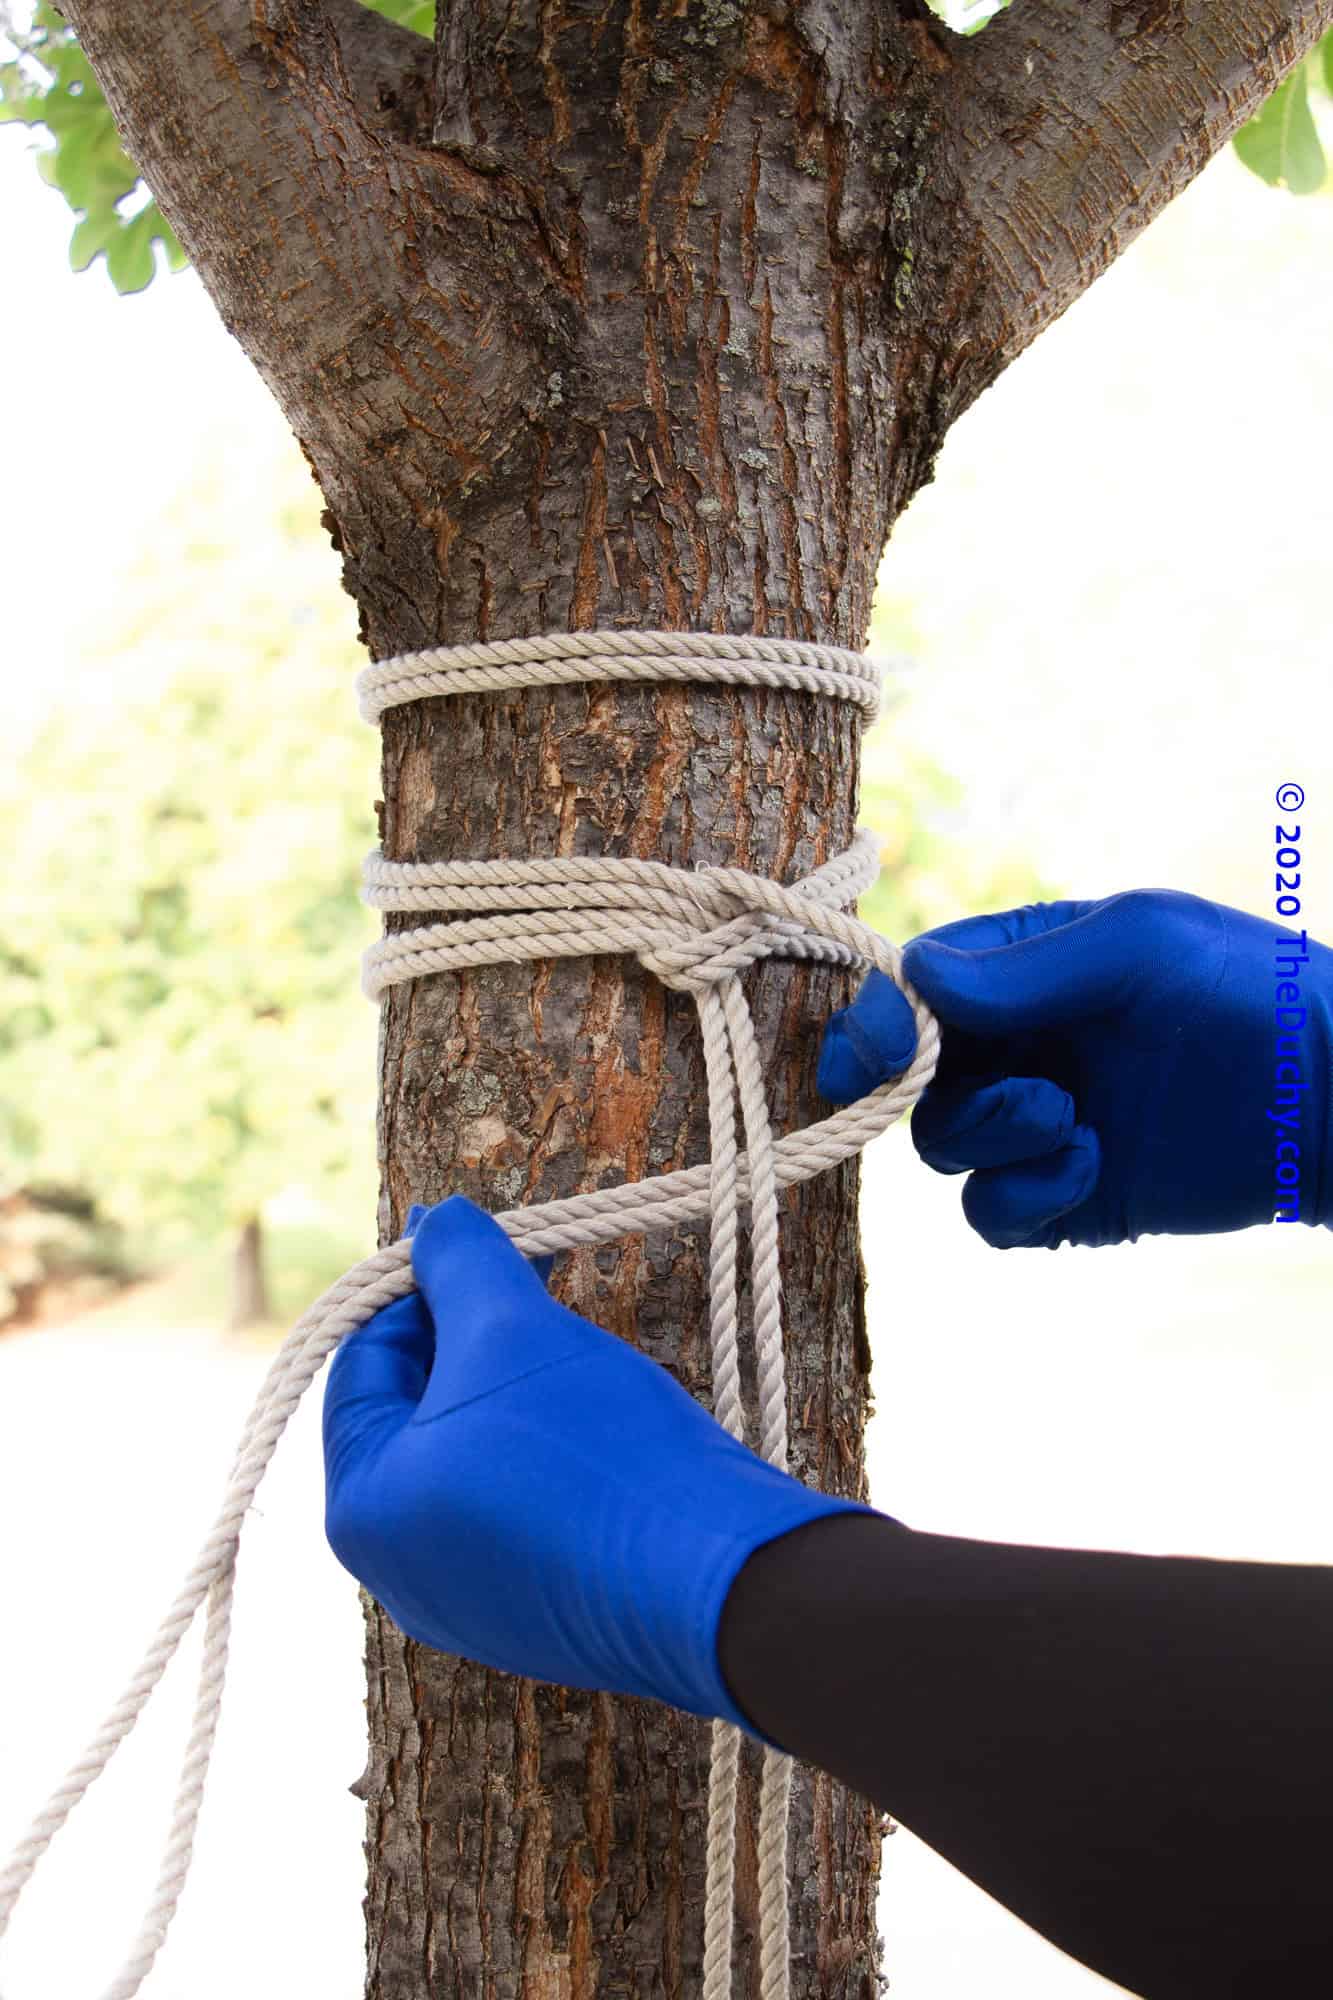
- Start away from the end of the rope, so you have a short end (bight) and a long tail.
- Place the line just under the mattress, on the first leg, where the ridge will sit.
- Run both strands straight back and pull them very firm around the leg. Cross them at the back of the leg, opposite the starting point.
- Come around to the front and drop down slightly. Keep tension very firm the whole time; the first wrap stays parallel to the mattress edge.
- Wrap the tail around the leg again below the first band, keeping the lines flat and parallel — no crossing up front.
- Loosen the new wraps just enough to slip the bight under the strap, then re-tighten hard.
- Reverse the tension: holding firm tension on both ends, rotate them opposite each other, lay the bight down over itself, run it under the tail, then reach through the loop and pull the bight through — the structure now looks like a Square Knot with a line through it. Pull both ends and the leg apart as hard as you can.
- Add one overhand on top and tighten it back into the center knot so it seats firm.
- Lock the tails down the leg: cross the tail over the bight, wrap around the leg, then half-hitch each end into the center band, pushing each new half-hitch tight against the knot. Repeat to use up your wraps.
- Your first hard point exists. The strap band itself is what you attach to — run connection lines around the band's cords, or clip a carabiner into them.
Repeat on the other leg of the same side. Two solid leg anchors → then string the ridge line between them: run your 30 ft line leg to leg underneath the mattress (it tucks there against the legs and will not slide down), pull it as tight as you can at each leg, and end with an overhand stopper knot in the tail so nothing can work loose.
3. The leg anchor: RTTHH & Anchor Hitch
The RTTHH (Round Turn, Two Half Hitches) and Anchor Hitch are the fastest reliable hitches for securing a rope under tension to a leg — this is the alternative to the full Hashira-style anchor above, and the archive's RTTHH tutorial was written for exactly this kind of anchoring:
They bind under sustained tension by design — ideal for a bed rig you want to untie after the scene, not for suspension hard points.
- Put even, uncrossed wraps around the bed leg, holding tension on the working end.
- Take a full round turn around the leg, passing the working end across the standing lines — the reverse-tension crossing.
- Hold the bight from that crossing and form the first half hitch around the standing lines.
- Add a second half hitch on top and dress flat.
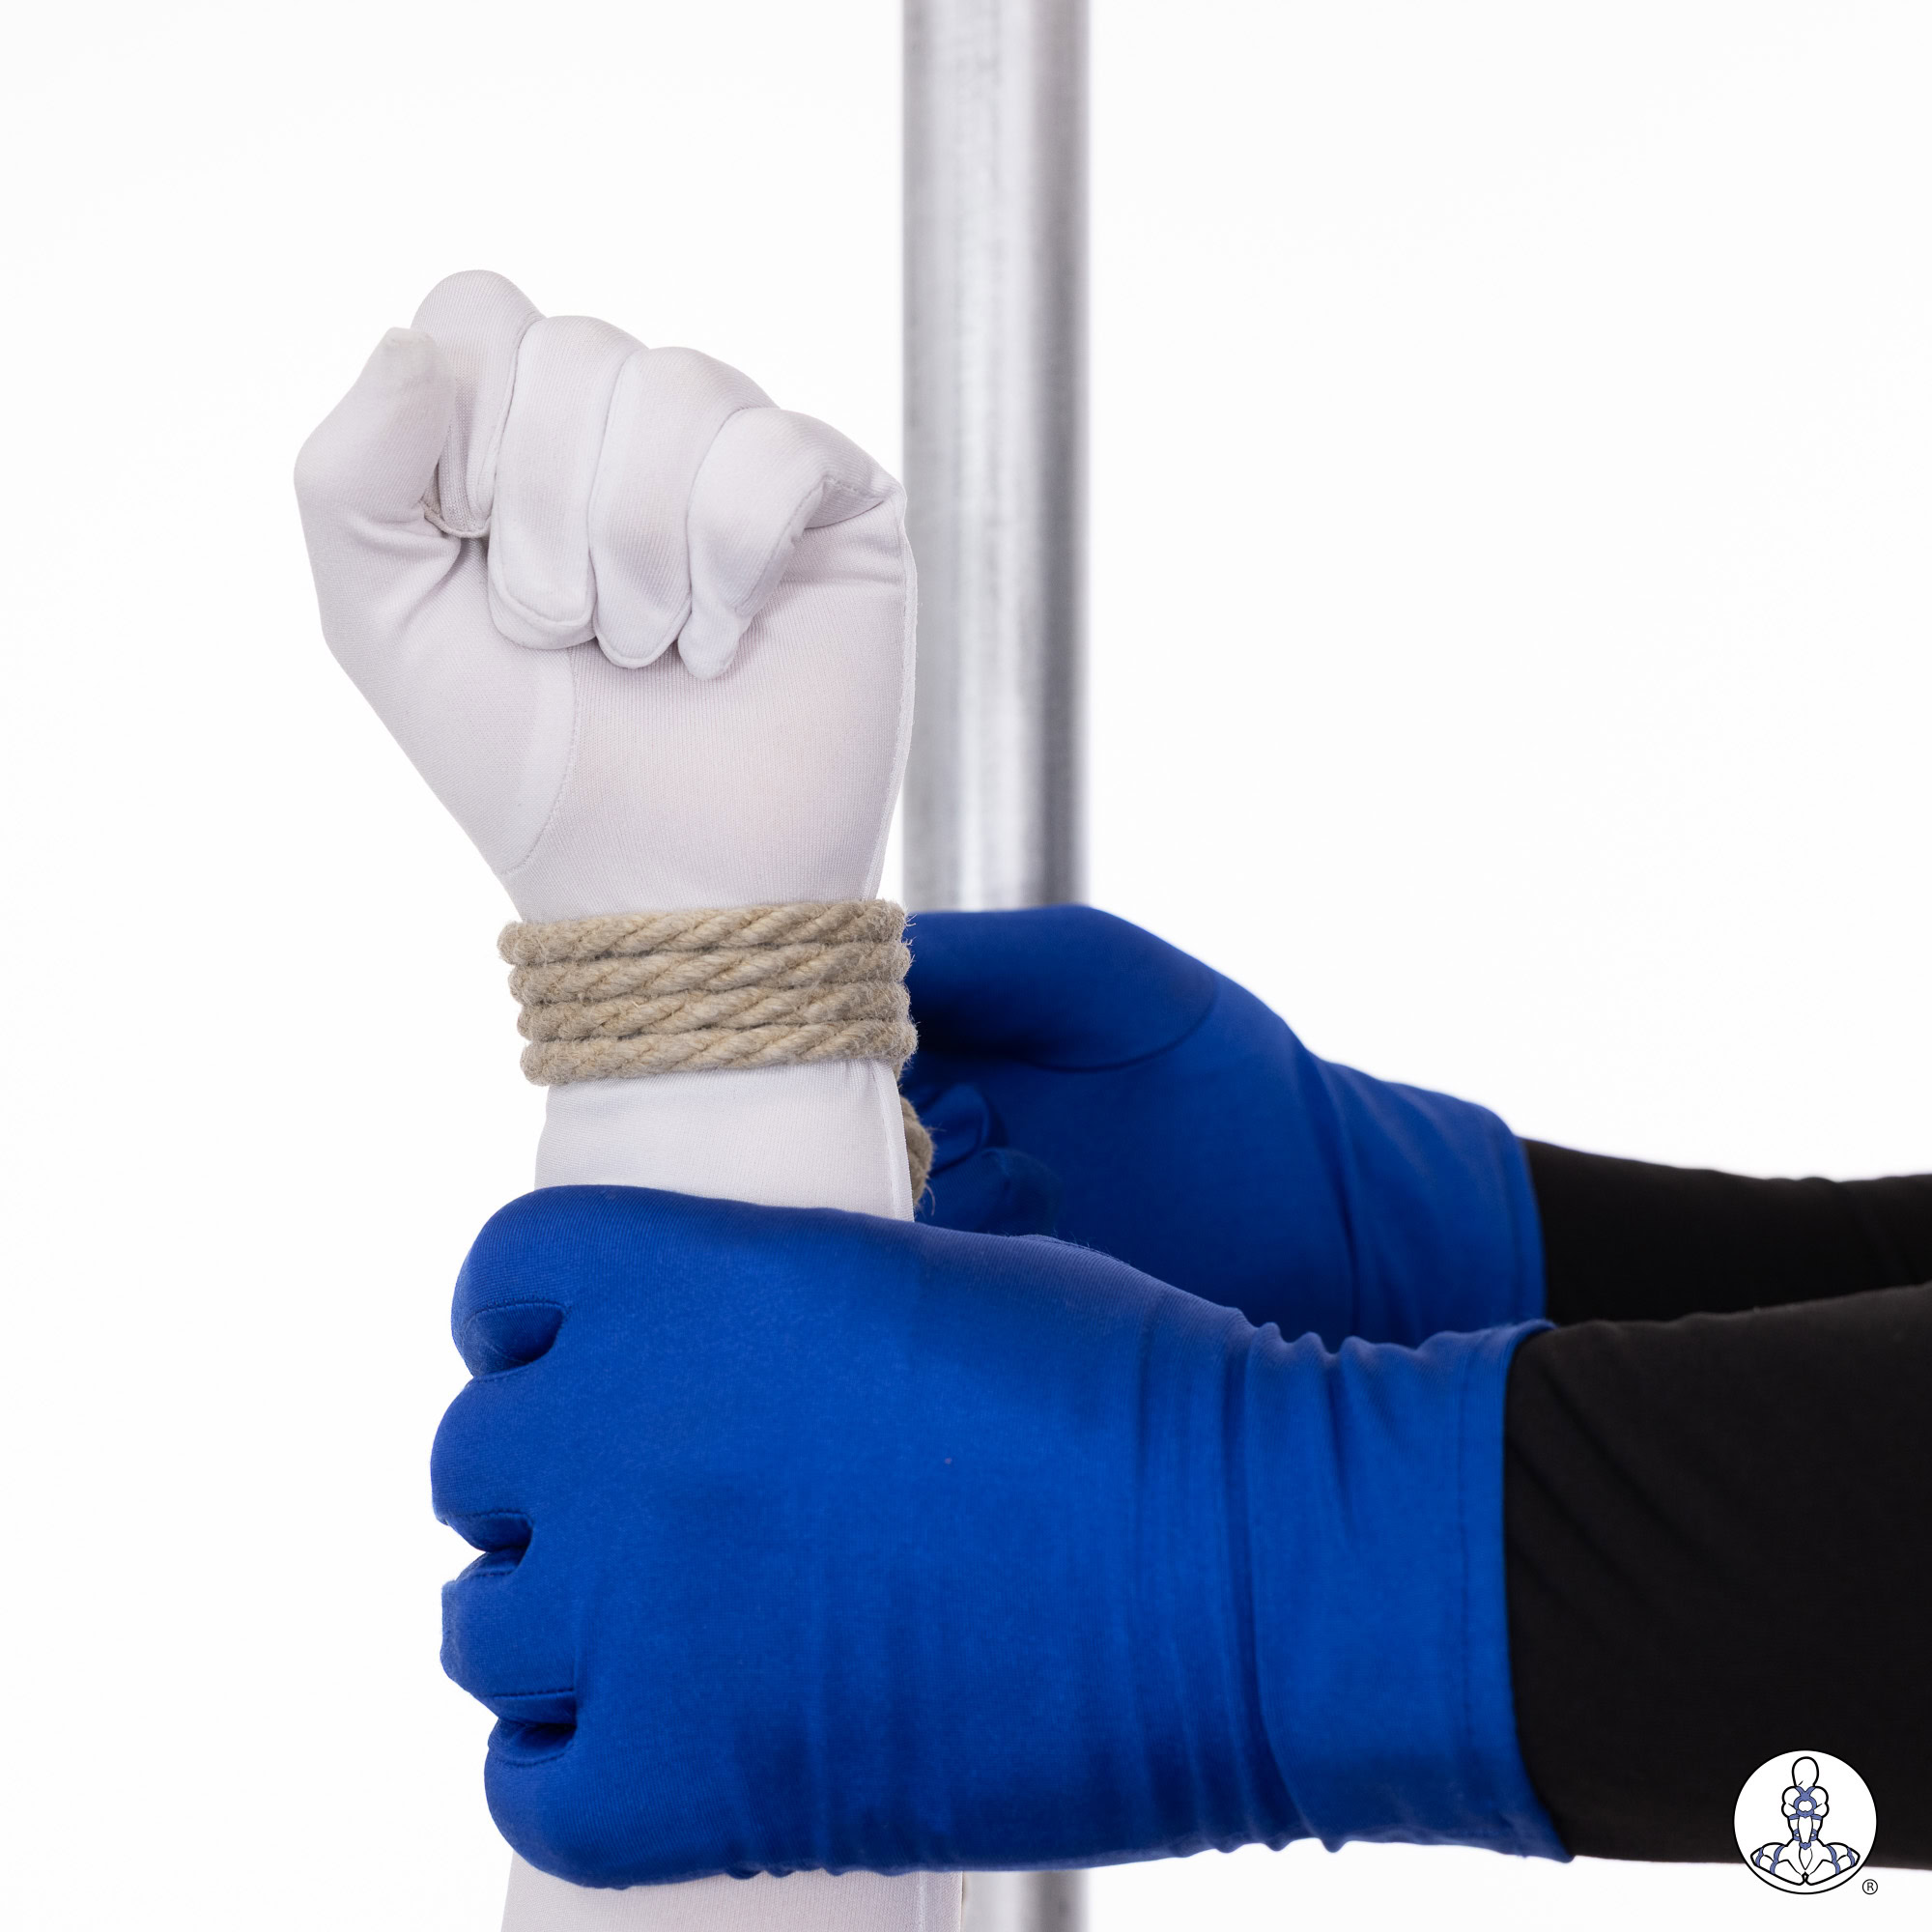
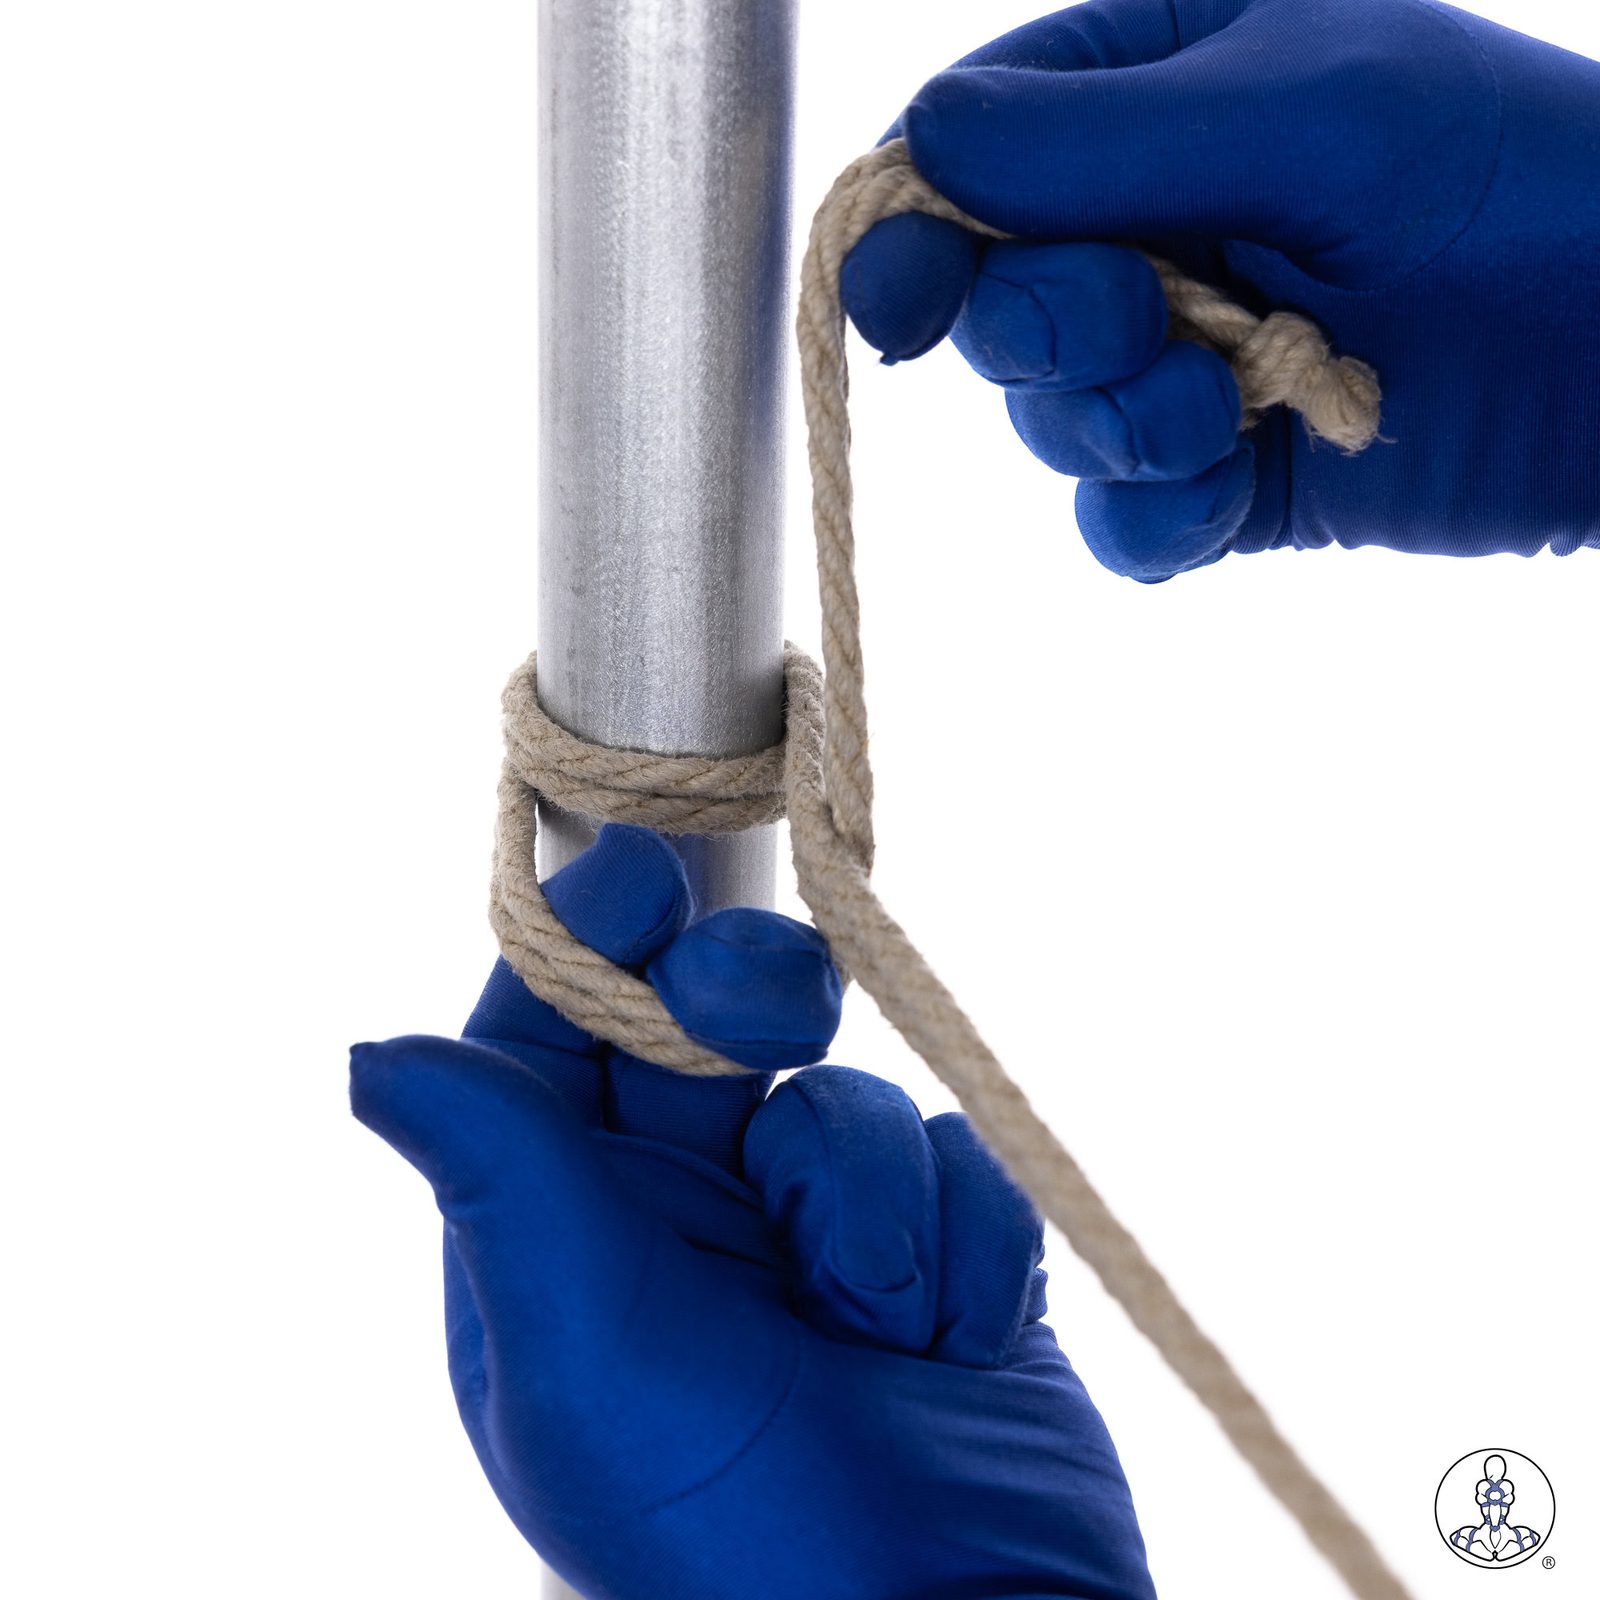
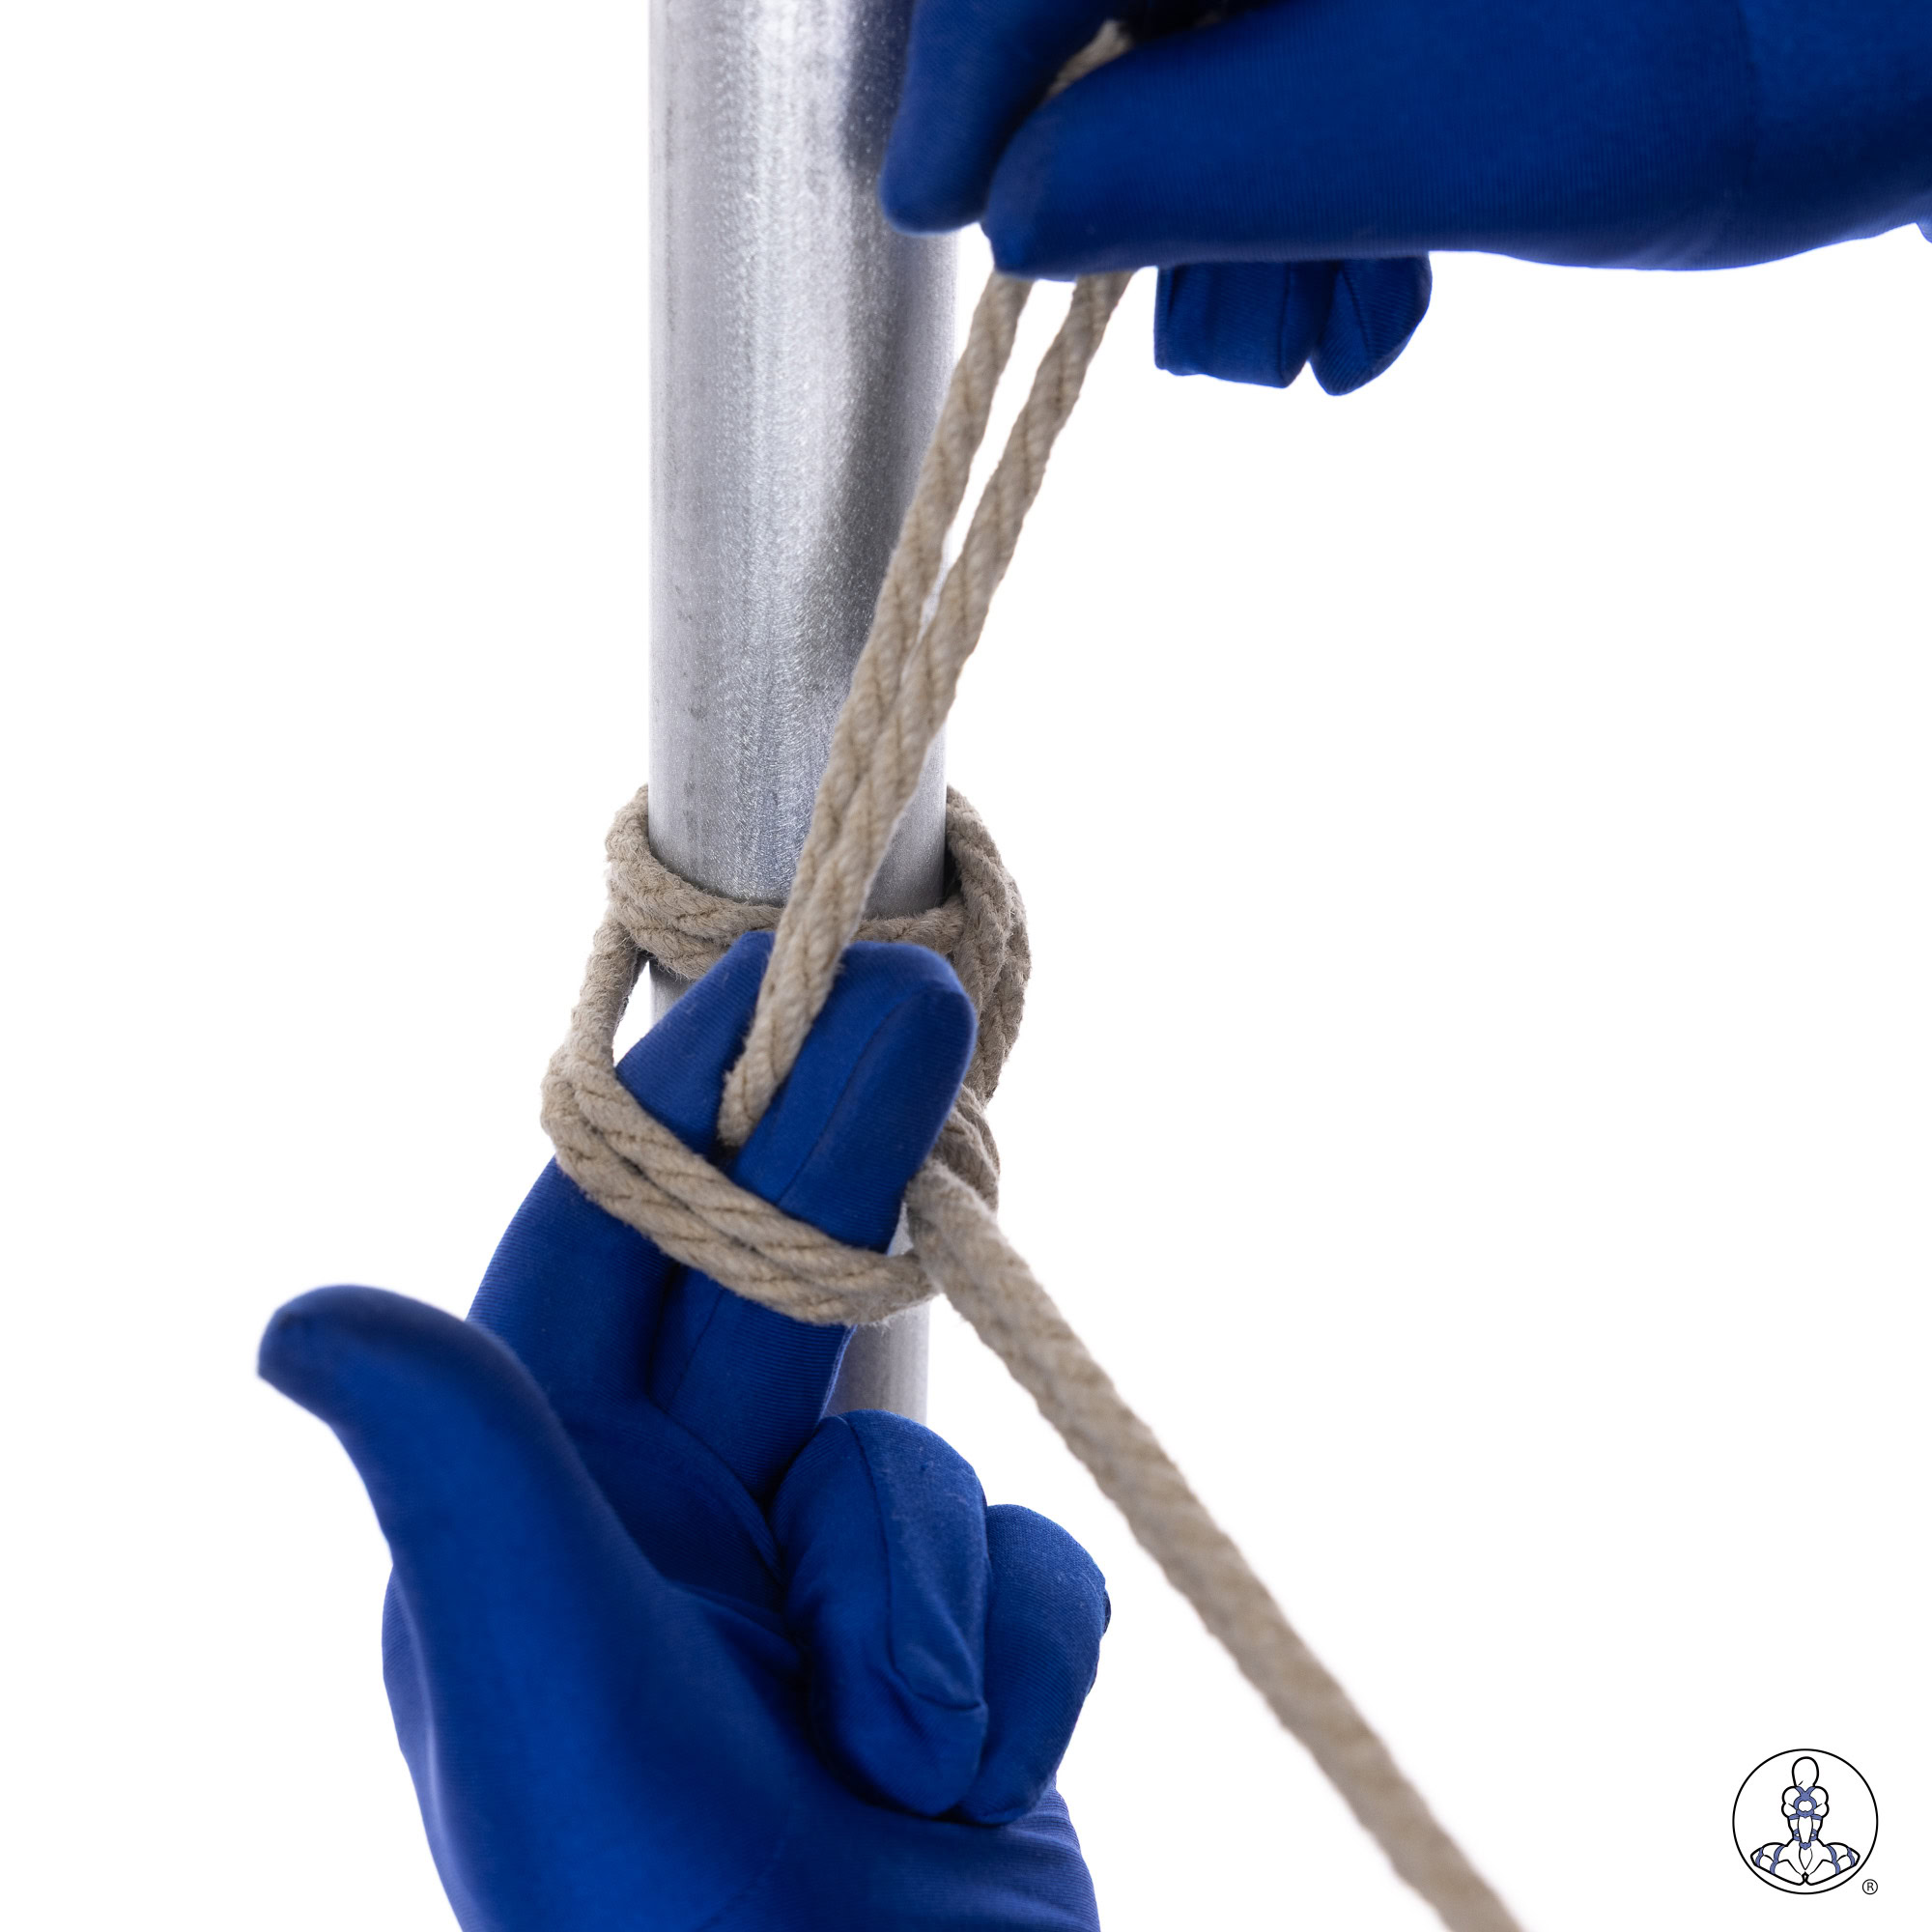
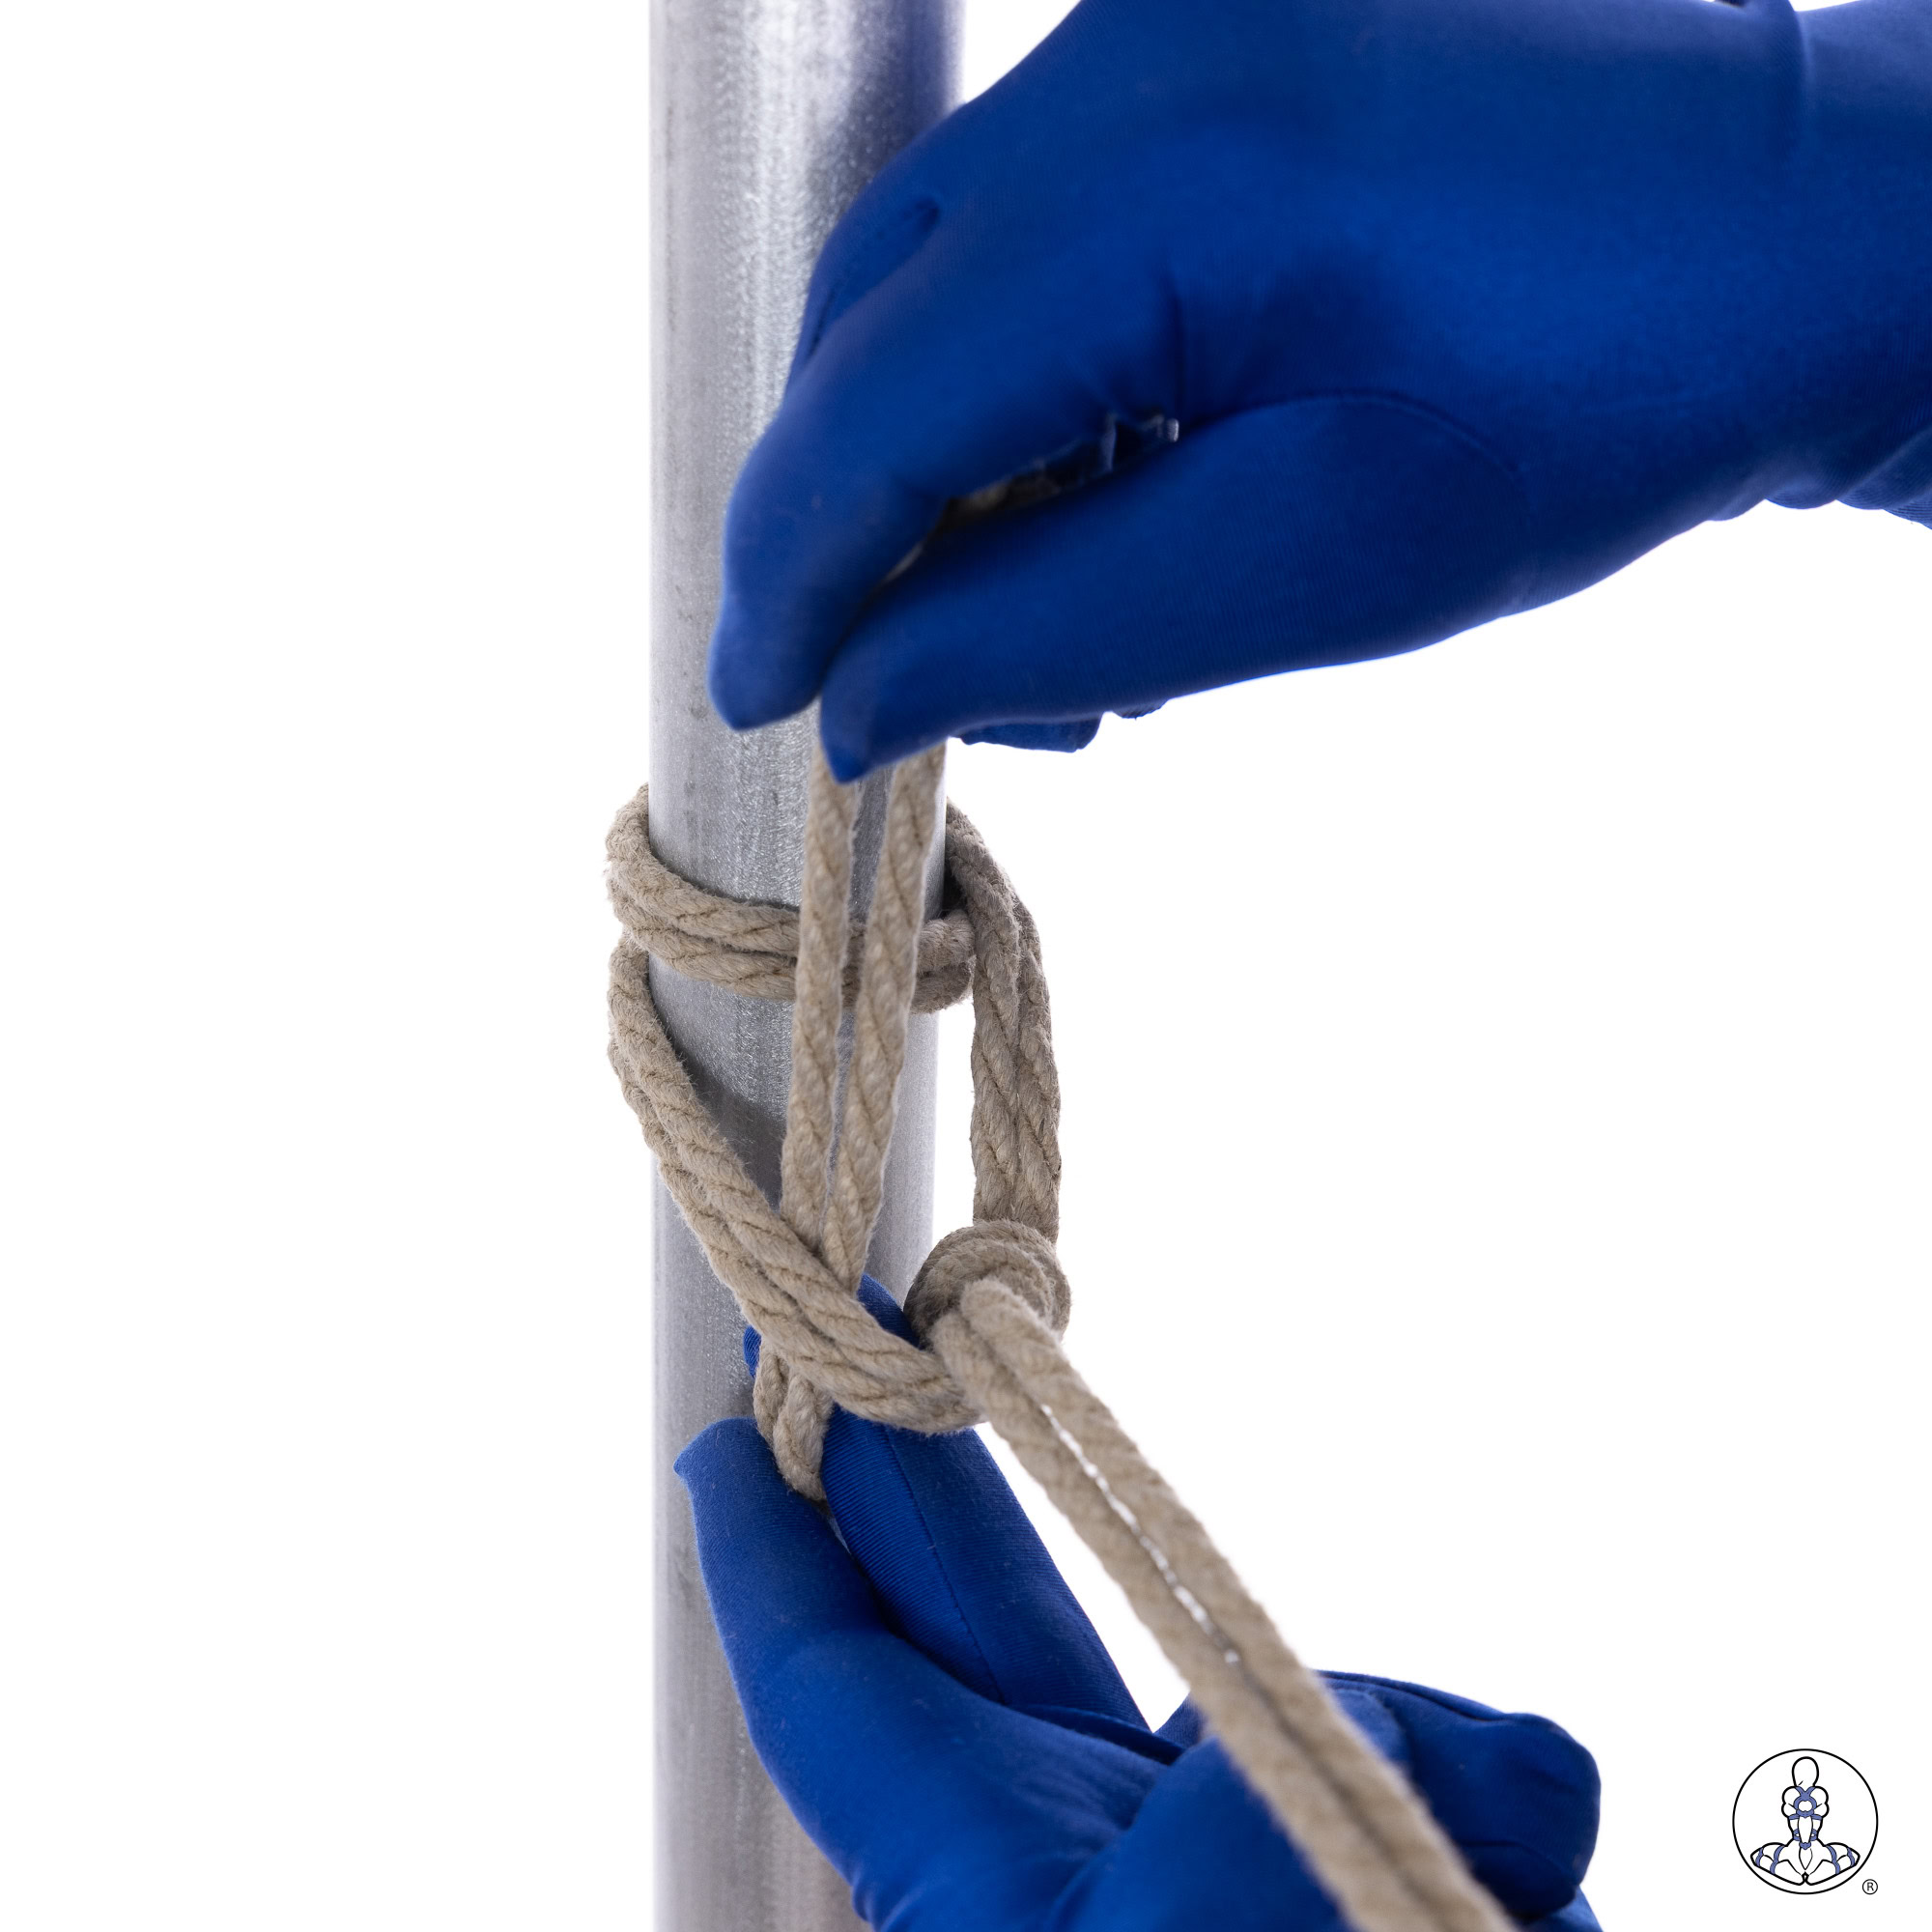
RTTHH technique steps. © TheDuchy. Practice with both hands — scenes will not always offer your dominant side.
4. Prusik Head — the locking attachment
The core trick of the whole system: a friction hitch that slides freely when unloaded, locks rock-solid when the connection line takes tension. That behavior is what makes an attachment on a ridge line adjustable — and safe.
Method 1 — in-hand (for cuffs & shackles)
- Drape the centre of the rope over thumb and forefinger.
- Wrap the thumb-side end around the thumb once, then again.
- Do the same around the forefinger.
- Touch thumb and forefinger together and slide the ropes toward the fingertips.
- Dress the lines — that is the Prusik head.
Method 2 — cast onto an existing line (attach to a tensioned ridge line without untying it)
- Place a Lark’s head on the standing (ridge) line.
- Pull the bight out a little.
- Wrap it around again in the same direction it is already going, until the bight is back at the tail.
- Reach through, grab the tail, pull through.
- Tighten: pull the centre lines to cinch the inner loops, then work the outer loops, and dress flat.
Tightening tip: work the knot — pull centre cords a little, then the outer loops independently, then centre cords again. It should slide with slight resistance. Use 4 wraps in jute; 6 wraps only for soft slippery synthetics.
5. Prusik Anchor — the adjustable connection
This is the piece that gives you an anchor point you can slide and re-tension anywhere on the ridge line — developed by Lazarus Redmayne for adjustable anchors on a fixed line:
- Overhand stopper knot in the end of your connection rope.
- Form a Prusik head in the other end, run the tail through that head.
- Tail perpendicular to the knot + no tension → the whole assembly slides freely along the ridge line.
- Tail under tension → everything locks; it cannot slide.
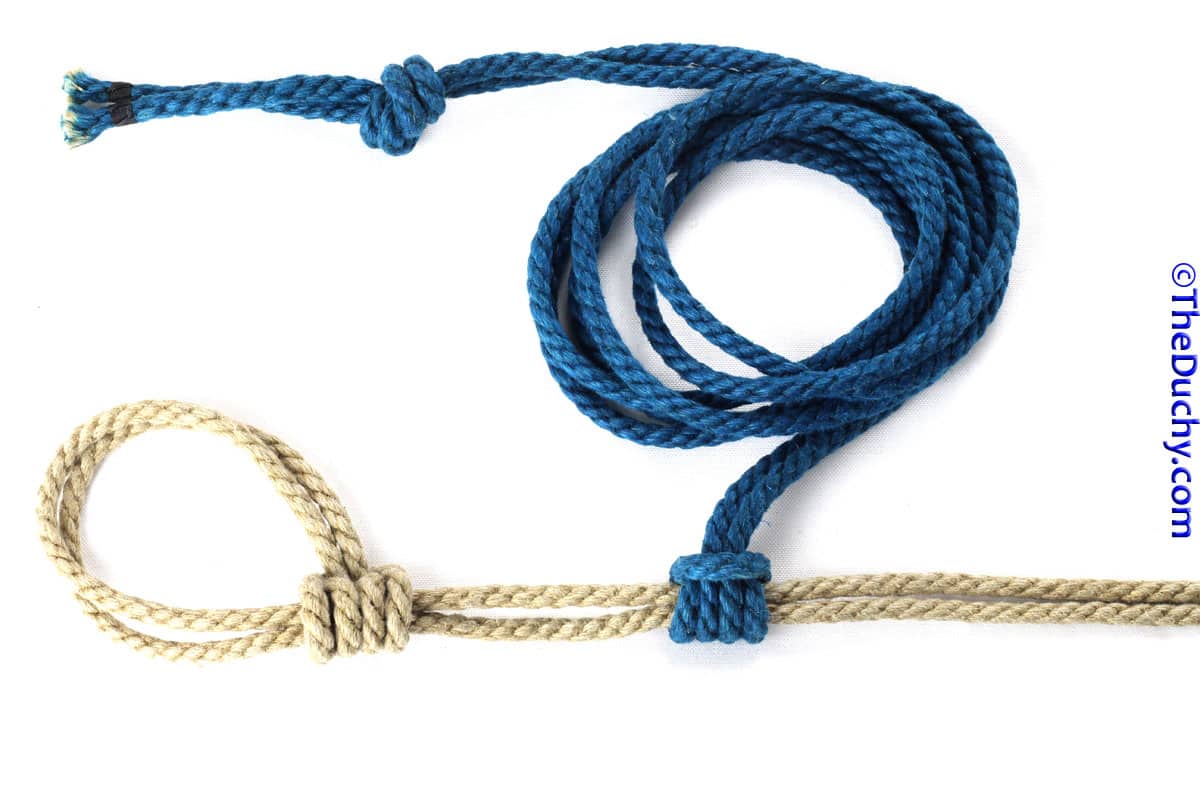
With it, the top holds the head to tighten or loosen the connection on the fly; a bottom who cannot reach the head can pull as hard as they want and stay locked.
6. Prusik Shackle — the quick cuff
For actually attaching a limb: a pre-tied cuff you can keep in the toy bag and apply in seconds — adjustable by the top, locked for the bottom:
- Tie a Prusik head mid-rope (6 coils for slippery rope).
- Feed both tails through one side, through all four loops.
- Tighten by pulling middle cords, then outer loops — snug, not tight.
- Fit to the limb: two fingers under the cuff, no more.
- Perpendicular head-lines → adjust; center-line tension → lock. Keep the head out of the bottom's reach.
7. Full rig, start to finish
- Two leg anchors per side — Hashira-style anchor (section 2) or RTTHH wraps (section 3) on each bed leg.
- Ridge line tensioned hard leg-to-leg between them, stopper knot in the tail. Optional second line at floor height.
- Limb → Prusik Shackle, tail up to the ridge line.
- Terminate that tail on the ridge line with a Prusik Anchor.
- Slide everything where you want it, load it, and everything locks in place.
Re-seat the wraps snug before you load the bottom. A dressed-but-not-tensioned Prusik is the one state it fails in. Check ridge line tension after the first session and again any time you re-rig.
8. Limits & safety
- No suspension or partial suspension from a ridge line between bed legs.
- Keep slack in play. Enough for the bottom to move their arms and adjust the cuff lay from time to time.
- Reach matters. Anything the bottom can reach, they can eventually adjust or escape — decide deliberately which points should be out of reach.
- Wrists are fragile. Heavy continuous stress on the wrists (e.g. yanking the feet end of a wrist-tied spread) can injure the joint — keep slack so the lay can shift.
- Check circulation constantly: colour, temperature, tingling. See the Safety Basics guide for nerves, circulation, emergency tools.
- Safety shears within arm’s reach, every scene, no exceptions.